Organizing My Kitchen with Airtable
My kitchen is by no means a shipwreck, but there’s definitely room for improvement. I’ve been hearing a lot of buzz about Airtable which proclaims to help you “organize anything”, so I thought “hey some organization can’t hurt” and spent Sunday inventorying my entire kitchen.
I've spent the day putting my entire kitchen inventory and my recipes into @airtable and this is one of the best Sundays I've had in a while.
— Tara Vancil (@taravancil) June 10, 2018
What’s Wrong with My kitchen?
What’s A Shopping List?
A trip to the grocery store involves me strolling through each aisle, hoping the items we need will jump out at me. For me, this scan-every-aisle approach works better than trying to write a shopping list by peering into the fridge and piecing together what’s missing, but it’s not perfect.
Walking every aisle takes time, and sometimes I still forget things! Fewer things than if I wrote a shopping list from memory, but it’d be nice to not forget things.
Cooking Isn’t Hard, But Planning Is
Over the years I’ve realized that preparing a meal is the least burdensome part of the cooking process. Surveying what ingredients I have available and deciding what to make for dinner demands much more of my attention.
I cook at least one meal a day, so going through that decision-making process every day eats up a non-negligible chunk of my time and energy.
Food Waste
When I buy items with a short shelf life, like fresh basil, mint, or ripe avocados, I often forget about them before it’s too late. I’d like to stop wasting so much food, and to be able to make the dishes that I set out to make in the first place.
Fixing My Kitchen
I went into this project hoping that Airtable could help me do three things:
- Build an automatically-generated shopping list
- Tell me which recipes I can make based on my inventory
- Highlight perishable items that will expire soon, so I can make an effort to use them
I was able to accomplish all three and I’m so stoked! I feel like my kitchen is a well-oiled machine now.
I worked on this a bit more tonight and now it:
— Tara Vancil (@taravancil) June 12, 2018
- prepares my shopping list
- highlights perishable items that will expire soon
- shows what recipes I can make based on current inventory
I’ll share screenshots tomorrow but wow my kitchen organization dreams are coming true 🤩 https://t.co/yhR43Nhror
How I Did It
Step 1: Inventory
I started off by creating an Airtable “base” called “Kitchen”. A base is basically a workspace for a project.
Then I inventoried my entire kitchen. My fridge, cupboards, freezer, spice drawer, everything. This took several hours, but I found it an enjoyable and relaxing Sunday chore.
Each record in the Inventory table has the following fields:
- Name (single line text)
- Quantity (integer)
- Intake date (date)
- Lifetime (integer, how many days I expect it to last beyond its intake date)
- Staple? (checkbox, is this something we should always have on-hand?)
Step 2: Recipes
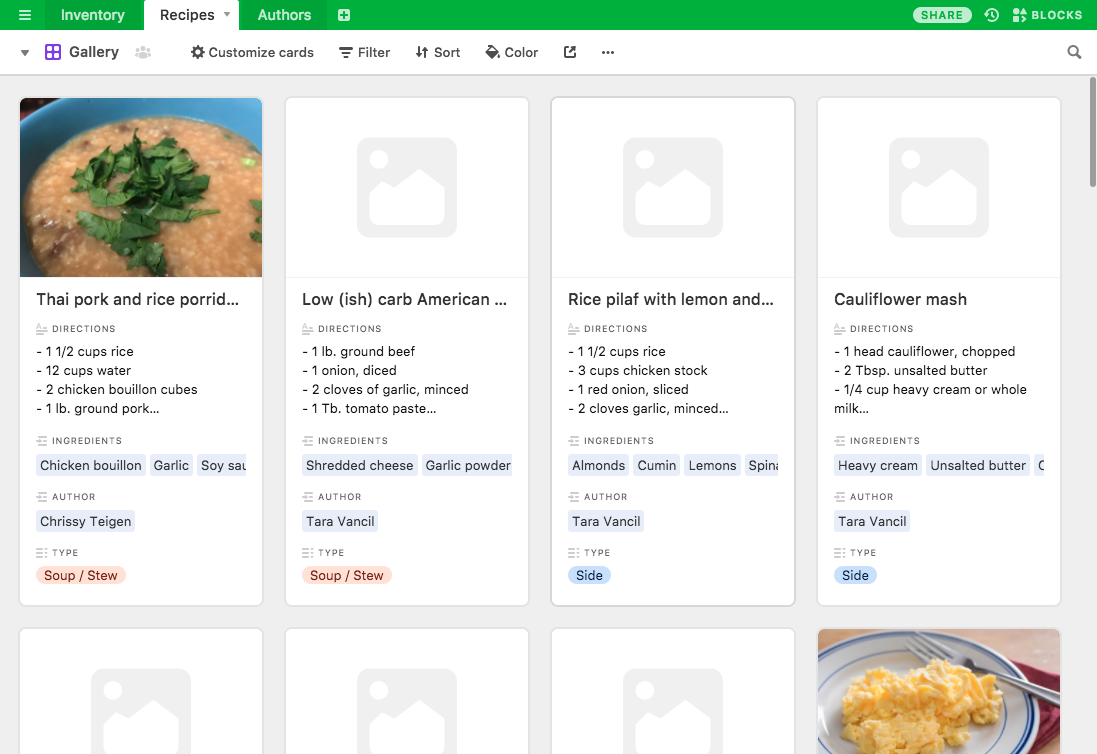
Next I started importing my recipes. This took…a long time. That’s ok because it’s the kind of process that will never be finished, and I’m thrilled to have all the recipes I like in one place. I imported the few recipes I’d already published on my website, and also some of my favorites from other authors.
Each record in the Recipes table has the following fields:
- Name (single line text)
- Directions (Long text, includes ingredient quantities and directions)
- Ingredients (Link to Inventory records)
- Ingredients (optional) (Link to Inventory records)
- Image (an image)
- Author (Link to Authors records)
- Type (Multiple select)
- Oven temperature (single line text)
- Low carb? (checkbox)
Note: The Authors table just has one field, Name. Not interesting enough to say more about it.
Getting even this far was satisfying, because I had a beautiful grid of all my recipes in one place!
This was great! But I still hadn’t completed any of the features I set out to do. Onward.
Step 3: Views, Formulas and Rollups
Once I finished entering records into the Inventory and Recipes tables, it was time to create some views.
Automatically Generating A Shopping List
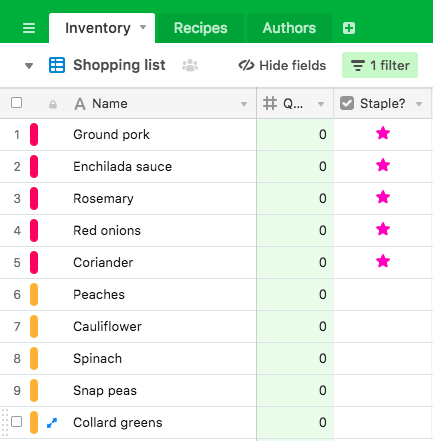
I tackled the shopping list first because I suspected I’d able to get all the info I need just using Airtable’s filters, colors, and sort features, and I was right!
I created a new Grid view over the Inventory table with two color rules applied. I highlighted staple items we’re completely out of (red) and items that we don’t have, but aren’t staples (yellow).
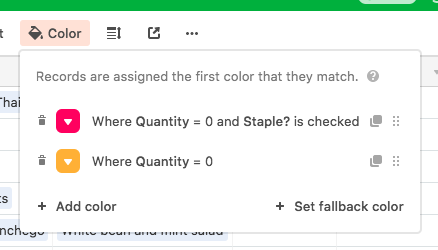
Then I added a filter that only shows items Where Quantity <= 1. And finally I added two sorts:
Staple?from checked to uncheckedQuantityin ascending order
The end result is an easy-to-read and automatically-generated shopping list! Airtable has a nice iOS app, so I’ll be to update my inventory with my phone as I shop.
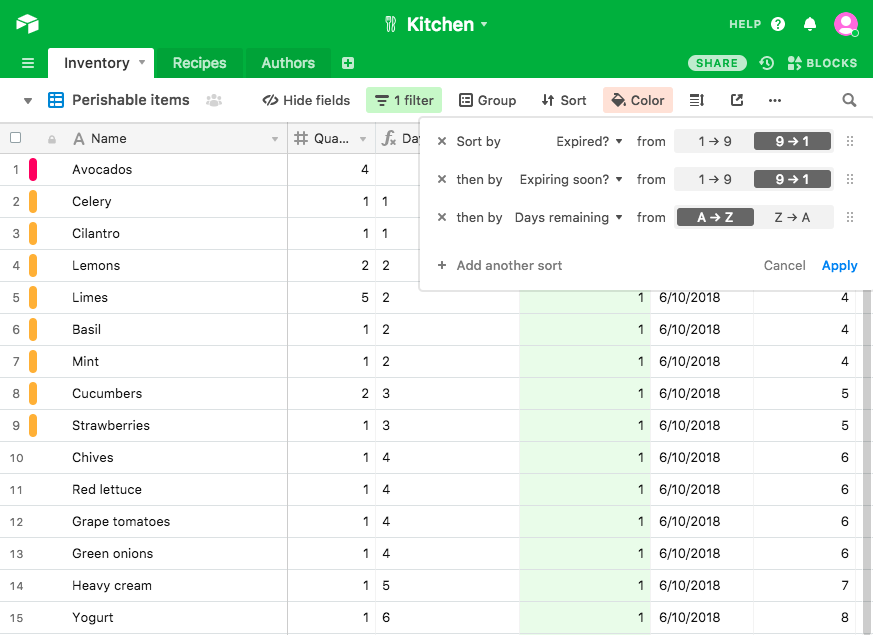
Highlighting Items That Will Expire Soon
Next up was a view for marking items that have expired or will expire soon. I already had fields for Intake date and Lifetime on Inventory records, so I knew if I could figure out Airtable’s date and time functions I’d be on my way.
I added four new Formula fields to Recipes records which calculate if an item is perishable, if it’s expired, or if it’s about to expire soon.
- Perishable?
  - AND({Lifetime}, {Intake date}, Quantity > 0)
- Days remaining
  - IF({Perishable?}, Lifetime - DATETIME_DIFF(NOW(), {Intake date}, 'days'), '')
- Expired?
  - AND({Perishable?}, Lifetime - DATETIME_DIFF(NOW(), {Intake date}, 'days') <= 0)
- Expiring soon?
  - AND({Perishable?}, NOT({Expired?}), Lifetime - DATETIME_DIFF(NOW(), {Intake date}, 'days') < 3)
Finally I filtered out non-perishable items, added color labels to records that have expired (red) or will expire soon (yellow), and then sorted the results:
Expired? in descending order Expiring soon? in descending order Days remaining in ascending order
The result is a succinct list that I can quickly glance at as a reminder of which ingredients I should make an effort to use immediately.
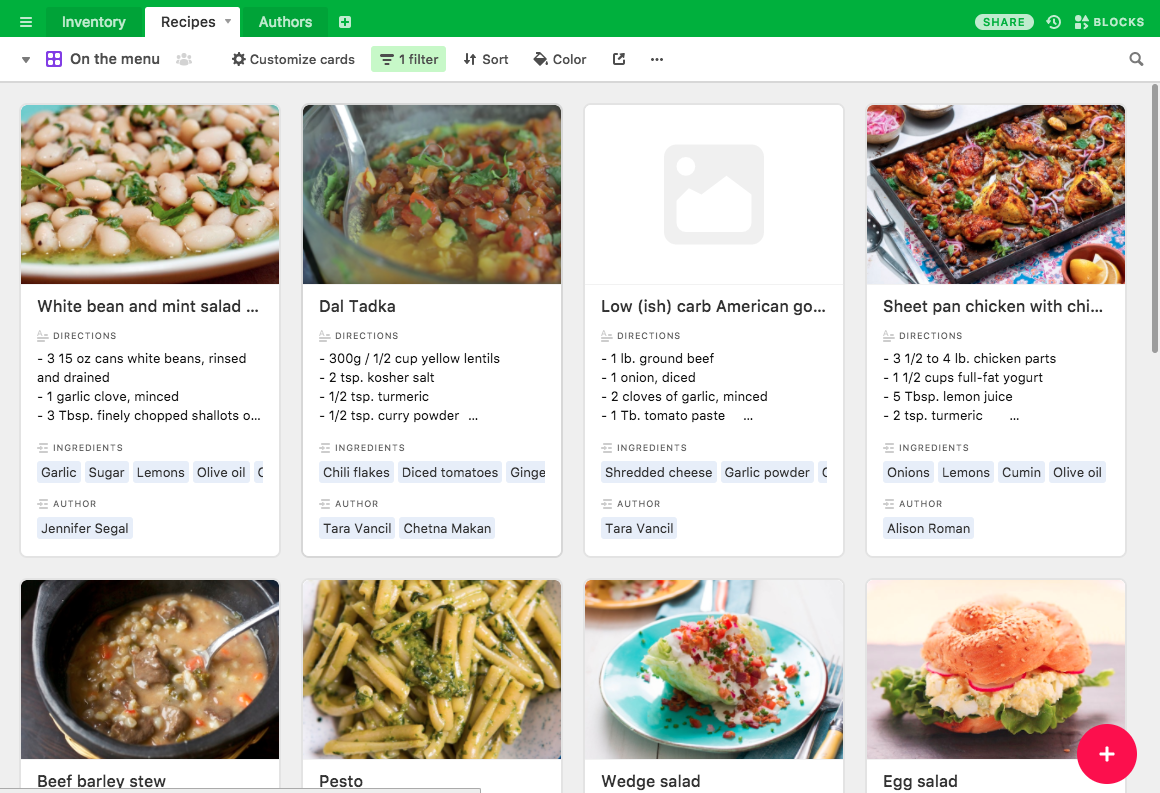
Creating A List of Recipes I Can Make with the Current Inventory
Last up is making a list of recipes I can make at any given moment. I was worried this would be difficult, but it turned out to be the simplest task of all!
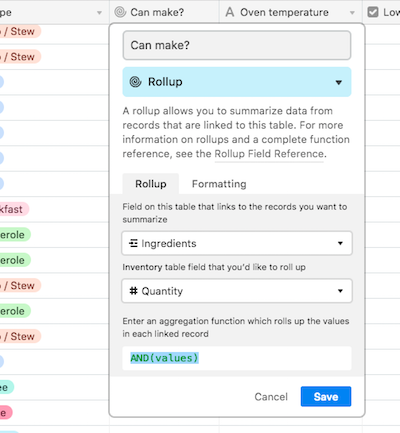
I needed to use a type of field called a Rollup, which is for aggregating data from a field that links to a different table. Not totally intuitive at first, but once you see it in action it might make more sense.
So each Recipes record has an Ingredients field that links to Inventory records. If all the linked records in the Ingredients field have a Quantity > 0, then I can make the recipe!
I added a new Rollup field to the Recipes table and told Airtable that I want to look at the Ingredients field and summarize each one’s Quantity. Then I just needed to provide an aggregation function to give me a meaningful value. I used AND(values) because if even one Quantity is 0, I can’t make the recipe!
Finally I made a new Grid view over the Recipes table called “On the menu” with just one simple filter: Where Can make? = 1.
And that’s it! Now I have a list of recipes I can make at any given moment based on what’s in my fridge and cupboards. I have a feeling this will go a long way to reduce how much time I spend planning meals, and I man, I’m stoked about it.
What’s Next?
Probably nothing! It would be nice to be able to press a button that can automatically update my inventory after making a recipe, but I’ll save that for another weekend. For now, I’m over the moon excited about how this turned out.
Have you tried something like this before? Is there a killer Airtable feature I’m missing out on that would be useful here? Let me know on Twitter!